Manual CRUD Operation in MVC With Entity Framework Code First Approach part 1

This is continuation part to CRUD Operation in MVC With Entity Framework Code First Approach


If you have read my last article you may notice, while creating front view we have used automated process for creating the front end.

but in real time working this may not seems to work. because of the front end view limitation.

So we have to manually save the data to server with or without ajax.

In this article I am going to discuss manual coding for create part, that will create the User and show the message on the front View


If you are following along me, you have previous code with basic model and Context Class.

if Not then first install MVC and  create a class file with the following code in the model folder


 public class User
    {
        public User()
        {
        }
        public int UserID { get; set; }
        public string UserName { get; set; }
        public DateTime DateOfBirth { get; set; }
        public byte[] Photo { get; set; }
        public int Age { get; set; }
        public Account account { get; set; }
        public DateTime CreatedDate { get; set; }

    }
    public class Account
    {
        public int AccountId { get; set; }
        public float Balance { get; set; }

    }

    public class AccountContext : DbContext
    {
        public AccountContext() : base()
        {  

        }

        public DbSet<User> Users { get; set; }
        public DbSet<Account> Accounts { get; set; }

    }


After pasting code, just rebuild project.

Right click on Controller and add new controller. this time I am going to change the name of controller.


this will add the basic code for CRUD Operation Process without any entity Framework.

 Now search for the Create Method that have no parameter.

Right about the return word, right click and select Add View option


 Select the option as of given above and click add.
if you are not getting User Model Class, then just rebuild.

you may notice this time again html code is code i create automatically.
but you can customize it.In this article I am focusing on the MVC code not on Html Side.
This is beyond the topic.

Now come back to controller and this time go to create method with param (FormCollection collection)


first change FormCollection--> User Class and collection--> usr

and within the try block paste following code.


   if (ModelState.IsValid)
                {
                    AccountContext ac = new AccountContext();
                    ac.Users.Add(usr);
                    ac.SaveChanges();
                    ViewBag.Status = "Saved";
                    return View();
                }
                else
                {
                    return RedirectToAction("index");
                }

Last Step. Go to Create View (recently Created) and paste the code just below the submit button.

@ViewBag.Status

and run the project and go to /NewUsers/create.


Data is Saved Successfully.

Feel Free to drop message @RakeshYadvanshi.

CRUD Operation in MVC With Entity Framework Code First Approach


This is continution part to Code First Approcach startUp with MVC

Let's assume that we want to create a simple application for Banking Apllication. Admin of this Banking application should be able to add or update User, add account and add money. Instead of designing database tables first, let's start creating classes for our Banking  domain, as and when needed. First, we will create two simple User and Account classes where every User is associated with one Account as shown below.

Right Click on Model folder and add new Class


 User Class Defination

  public class User
    {
        public User()
        {
        }
        public int UserID { get; set; }
        public string UserName { get; set; }
        public DateTime DateOfBirth { get; set; }
        public byte[] Photo { get; set; }
        public int Age { get; set; }
        public Account account { get; set; }
        public DateTime CreatedDate { get; set; }

    }


Account Definition

public class Account
    {
        public int AccountId { get; set; }
        public float Balance { get; set; }

    }


Now, we are done with the initial domain classes for our Banking application. Code-First approach also requires context class which should be derived from DbContext

Create a context class as shown below, which derives from DBContext class and exposes DbSet properties for the types that you want to be part of the model, e.g. User and Account class, in this case. DbSet is a collection of entity classes (aka entity set), so we have given property name as plural of entity name like Users and Accounts .

If you are going to paste this code as such then you have to add new namespace that give you the access to class DbContext .

using System.Data.Entity;

 Now, we are done with the required classes for the code-first approach. We will now add Banking application using context class


 public class AccountContext : DbContext
    {
        public AccountContext() : base()
        {

        }

       public DbSet<User> Users { get; set; }
        public DbSet<Account> Accounts { get; set; }

    }

 Now Front View.

Right Click on the Controller folder and select folder.


Note: if you don't get model class, rebuild and try again.


 Click add and you are done.

Every thing is ok. not event single code to write and you are done with CRUD operation in Mvc with entityFramework.

Last Thing you Have to do is add connection string if you are not using express version with default instance name
if you following along me article, then first you get this page with big server error ,  


 But this is not the bug in the code.

just add /Users to existing Url and hit error.


 For any error come to feel free to drop message at @RakeshYadvanshi
  
Download Code here

Code First Approcach startUp with MVC

Prerequisite:
you should be aware of basic working experience with visual studio

Souce: CodeProject

In this Article I am going to set up environment MVC project with EF

Entity Framework introduced Code-First approach from Entity Framework 4.1. Code-First is mainly useful in Domain Driven Design. With the Code-First approach, you can focus on the domain design and start creating classes as per your domain requirement rather than design your database first and then create the classes which match your database design. Code-First APIs will create the database on the fly based on your entity classes and configuration.


As a developer, you first start by writing C# or VB.net classes and context class. but I will start with c# When you run the application, Code First APIs will create the new database (if it does not exist yet) and map your classes with the database using default code-first conventions. You can also configure your domain classes to override default conventions to map with database tables using DataAnnotation attributes or fluent API.
The basic workflow would be:
Write application domain classes and context class→ configure domain classes for additional mapping requirements → Hit F5 to run the application → Code First API creates new database or map existing database with domain classes → Seed default/test data into the database → Finally launches the application

What is Application Domain class or context classes or seed , For now just keep them in your mind as Class with some properties and methods. I will explore these word in deep in upcomming articles

I have installed following. but you following along me with any of the version of visual studio 2010+ any sql server
  • .NET Framework 4.5.2
  • Visual Studio 2015
  • MS SQL Server 2012 Express
1. Create Empty MVC project.
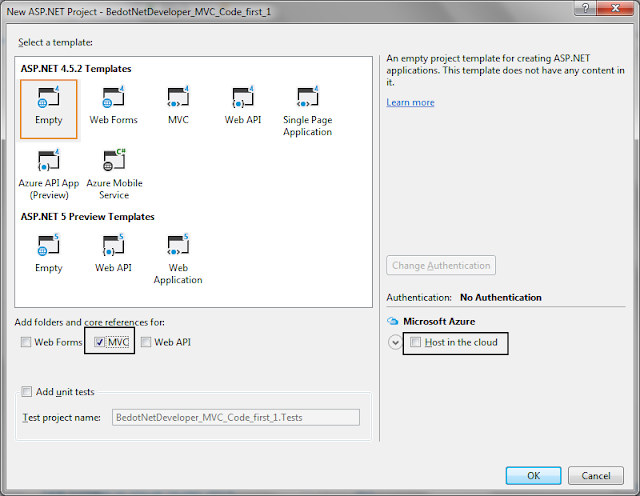
2. Select Empty Mvc Project.


3. Right click on your project in the solution explorer and select Manage NuGet Packages.


4. This will open Manage NuGet Packages dialogue box.


5.  This will search for all the packages related to Entity Framework. Select EntityFramework and click on Install.
6. press ok for first pop up if come.

7. Click on the I Accept button in the License Acceptance dialogue box to start the installation.
8. After installation, make sure that the appropriate version of EntityFramework.dll is included in the project.

 Finally your project is setup for your mvc project with EntityFramework.
download this project at Link 

Different approaches to model entities in Entity Framework

This is continuation part to the  Introduction to EntityFramework

Source: Msdn


In this article I will be describing the three approaches to using Entity Framework (EF) – Model First, Database First and Code First.

Entity Framework simplifies data access in your application by enabling you to write code to perform CRUD (Create, Read, Update and Delete) operations sans the need of interacting with the underlying database provider directly. There are three approaches to model your entities in Entity Framework: Code First, Model First, and Database First. This article discusses all these three approaches and their pros and cons.


In the sections that follow, we will explore each of the three approaches to modeling entities using Entity Framework.

Code First

The Code First approach helps you to create the entities in your application by focusing on the domain requirements. In essence, you can follow Domain Driven Design (DDD) using this approach. Once your entities have been defined and the configurations specified, you can create the database on the fly using both. The Code First approach gives you more control over your code -- you don't need to work with auto generated code anymore. I like this approach as this gives you a lot of flexibility and control. If you have the domain classes ready, I would always prefer this approach as you can easily create your database from the domain classes.

The downside to this approach is that any changes to the underlying database schema would be lost; in this approach your code defines and creates the database. The Code First approach allows you to use Entity Framework and define the entity model sans the designer or XML files. You can use the POCO (Plain Old CLR Objects) approach to define the model and generate your database.


Database First

You can use the Database First approach if the database is already designed and is ready. In this approach, the Entity Data Model (EDM) is created from the underlying database. As an example, you use the database first approach when you generate the edmx files in the Visual Studio IDE from the database. Manual changes to the database is possible easily and you can always update the EDM if need be (for example, if the schema of the underlying database changes). To do this, simply update the EDM from the database in the Visual Studio IDE.


Model First

In the Model First approach you can create the EDM first, then generate the database from it. You would typically create an empty EDM using the Entity Data Model Wizard in Visual Studio, define the entities and their relationships in Visual Studio, then generate the database from this defined model. You can easily create entities and define their relationships and associations in the designer in Visual Studio. You can also specify the Key property and the data types for the properties for your entities using the designer. You can use partial classes to implement additional features in your entities.
OK, but when should you use the Model First approach? Well, if neither the domain classes nor the database is ready and you would rather define the data model using a visual designer, this approach is for you. However, like in the Code First approach, in the Model First approach manual changes to the database would be lost as the model defines the database.

Introduction To Entity Framework


ADO.NET Entity Framework is an Object/Relational Mapping (ORM) framework that enables developers to work with relational database. It enabling developers to deal with data as objects and properties.Using the Entity Framework, developers issue queries using LINQ, then retrieve and manipulate data as strongly typed objects using C# or VB.Net.
The Entity Framework’s ORM implementation also provides services like change tracking, identity resolution, lazy loading, and query translation so that developers can focus on their application-specific business logic rather than the data access fundamentals. ADO.NET Entity Framework is targeted for developing Enterprise applications which can support MS SQL databases as well as other databases like as Oracle, DB2, MySql and many more. To learn entity framework first we need to know what is orm.

What is ORM?


ORM is an acronym that stands for object/relational mapping. Basically, an ORM framework is used to persist model objects in a relational database and retrieve them. It uses metadata information to interface with the database. This way, your data-layer code knows nothing about the database structure. The ORM tool becomes middleware that completely hides the complexity.
The heart of ORM is the mapping—the mapping technique is what binds the object and relational worlds. By mapping, you express how a class and its properties are related to one or more tables in the database. This information is used by the ORM tool’s engine to dynamically build SQL code that retrieves data and transforms it into objects. Similarly, by tracking changes to objects’ properties, it can use mapping data to send updates back to the database. The mapping information is generally expressed as an XML file. As an alternative, some ORM tools use attributes on the classes and their properties to maintain mapping data.

Advantage of Entity Framework

  1. Productivity

    Entity Framework can take up to 35 percent of the entire application code. It make the developer’s life easier than ever. In spite of its limitations, the designer integrated into Visual Studio dramatically simplifies the mapping process.
  2. Maintainability

    Since you have the fewer lines of code to fetch data from database,the fewer lines of code you have to maintain. This is particularly true in the big projects.
  3. Performance

    The complexity of ORM introduces an obvious slowdown in performance. In entity framework first request to fetch data is little bit slow but after that is fast to fetch data from database.


    EF Version Introduced Features
    EF 3.5 Basic O/RM support with Database First approach.
    EF 4.0 POCO Support, Lazy loading, testability improvements, customizable code generation and the Model First approach.
    EF 4.1 First to available in the NuGet, Simplified DBContext API over ObjectContext, Code First approach. EF 4.1.1 patch released with bug fixing of 4.1.
    EF 4.3 Code First Migrations feature that allows a database created by Code First to be incrementally changed as your Code First model evolves. EF 4.3.1 patch released with bug fixing of EF 4.3.
    EF 5.0 Announced EF as Open Source. Introduced Enum support, table-valued functions, spatial data types, multiple-diagrams per model, coloring of shapes on the design surface and batch import of stored procedures, EF Power Tools and various performance improvements.
    EF 6.0 - Current release EF 6.0/6.1 is the latest release of Entity Framework. It includes many new features related to Code First & EF designer like asynchronous query & save, connection Resiliency, dependency resolution etc.

Entity Framework Models

Microsoft’s Entity Framework evolved from a methodology known as Entity Relationship Modeling (ERM). An ERM defines a schema of entities and their relationships with one another. Entities are not the same as objects. Entities define the schema of an object, but not its behavior. So, an entity is something like the schema of a table in your database, except that it describes the schema of your business objects. There are three models in the entity framework:
  1. CONCEPTUAL MODEL

    The conceptual model is where you describe the model classes. This file is split into two main sections: the first is a container that lists all the entities and the relationships that are managed by Entity Framework, and the second contains a detailed description of their structure.
  2. STORAGE MODEL

    The storage model is the equivalent of the conceptual model, but it describes the database organization. Not only is this file conceptually similar to the previous one, but it also uses the same XML nodes. Unlike the conceptual model, it isn’t possible to split this model into several physical files. The first section of this file lists all the tables, views, stored procedures, and foreign keys that are affected. The second section describes the items listed in the first node.
    Regarding tables and views, the columns and primary keys are described. When it comes to stored procedures, input and output parameters are described. The description of a foreign key contains information about the table involved, the cardinality, and the delete and update rules.
  3. MAPPING MODEL

    The mapping file is completely different. Its job isn’t to describe something but to compensate for the differences that exist between the two previous models. This is where the real magic of mapping happens: you map a class to one or multiple tables, map one table to one or multiple classes, define inheritance mapping, and map stored procedures for both updates and object retrieval.
    There is only one important node in this file: it associates the class to a table and can be repeated more than once to ensure that a class can be mapped against multiple tables, and vice versa. Like the storage description file and unlike the conceptual file, the mapping file can’t be split into multiple files. 
 This is the relationship diagram


Use Bootstrap html5 Editor in website with simple steps

Hi Folks
I am back after long time with small artical about bootstrap html5 editor .

In this article, I am going to tell you how to set up html5 bootstrap5 editor in in your own website


first download this small zip file that i have customized with to small no of files by deleting extra file so that user of this blog does not waste extra time that does not matter and just waste time.

Download Link - box link

create html page in the download editor folder
In the head part add following links

<link rel="stylesheet" href="css/prettify.css">

Free Download Window 10 PREVIEW

Hello friend,
I am here with the NEW WINDOW 10 PREVIEW from MICROSOFT


Just with few steps you can upgrade to window 10

step 1.Go to  http://windows.microsoft.com/en-us/windows/preview-download
step 2. sign up for window insider program to be a member of window program.
Step 3. After this you can upgrade to new window.
(NOTE. don't upgrade you working pc or laptop. This Window is for preview so have lot of bugs.)

                                                                    or

Direct download window 10 preview 32 

64 bits