Manual CRUD Operation in MVC With Entity Framework Code First Approach part 1

This is continuation part to CRUD Operation in MVC With Entity Framework Code First Approach


If you have read my last article you may notice, while creating front view we have used automated process for creating the front end.

but in real time working this may not seems to work. because of the front end view limitation.

So we have to manually save the data to server with or without ajax.

In this article I am going to discuss manual coding for create part, that will create the User and show the message on the front View


If you are following along me, you have previous code with basic model and Context Class.

if Not then first install MVC and  create a class file with the following code in the model folder


 public class User
    {
        public User()
        {
        }
        public int UserID { get; set; }
        public string UserName { get; set; }
        public DateTime DateOfBirth { get; set; }
        public byte[] Photo { get; set; }
        public int Age { get; set; }
        public Account account { get; set; }
        public DateTime CreatedDate { get; set; }

    }
    public class Account
    {
        public int AccountId { get; set; }
        public float Balance { get; set; }

    }

    public class AccountContext : DbContext
    {
        public AccountContext() : base()
        {  

        }

        public DbSet<User> Users { get; set; }
        public DbSet<Account> Accounts { get; set; }

    }


After pasting code, just rebuild project.

Right click on Controller and add new controller. this time I am going to change the name of controller.


this will add the basic code for CRUD Operation Process without any entity Framework.

 Now search for the Create Method that have no parameter.

Right about the return word, right click and select Add View option


 Select the option as of given above and click add.
if you are not getting User Model Class, then just rebuild.

you may notice this time again html code is code i create automatically.
but you can customize it.In this article I am focusing on the MVC code not on Html Side.
This is beyond the topic.

Now come back to controller and this time go to create method with param (FormCollection collection)


first change FormCollection--> User Class and collection--> usr

and within the try block paste following code.


   if (ModelState.IsValid)
                {
                    AccountContext ac = new AccountContext();
                    ac.Users.Add(usr);
                    ac.SaveChanges();
                    ViewBag.Status = "Saved";
                    return View();
                }
                else
                {
                    return RedirectToAction("index");
                }

Last Step. Go to Create View (recently Created) and paste the code just below the submit button.

@ViewBag.Status

and run the project and go to /NewUsers/create.


Data is Saved Successfully.

Feel Free to drop message @RakeshYadvanshi.

CRUD Operation in MVC With Entity Framework Code First Approach


This is continution part to Code First Approcach startUp with MVC

Let's assume that we want to create a simple application for Banking Apllication. Admin of this Banking application should be able to add or update User, add account and add money. Instead of designing database tables first, let's start creating classes for our Banking  domain, as and when needed. First, we will create two simple User and Account classes where every User is associated with one Account as shown below.

Right Click on Model folder and add new Class


 User Class Defination

  public class User
    {
        public User()
        {
        }
        public int UserID { get; set; }
        public string UserName { get; set; }
        public DateTime DateOfBirth { get; set; }
        public byte[] Photo { get; set; }
        public int Age { get; set; }
        public Account account { get; set; }
        public DateTime CreatedDate { get; set; }

    }


Account Definition

public class Account
    {
        public int AccountId { get; set; }
        public float Balance { get; set; }

    }


Now, we are done with the initial domain classes for our Banking application. Code-First approach also requires context class which should be derived from DbContext

Create a context class as shown below, which derives from DBContext class and exposes DbSet properties for the types that you want to be part of the model, e.g. User and Account class, in this case. DbSet is a collection of entity classes (aka entity set), so we have given property name as plural of entity name like Users and Accounts .

If you are going to paste this code as such then you have to add new namespace that give you the access to class DbContext .

using System.Data.Entity;

 Now, we are done with the required classes for the code-first approach. We will now add Banking application using context class


 public class AccountContext : DbContext
    {
        public AccountContext() : base()
        {

        }

       public DbSet<User> Users { get; set; }
        public DbSet<Account> Accounts { get; set; }

    }

 Now Front View.

Right Click on the Controller folder and select folder.


Note: if you don't get model class, rebuild and try again.


 Click add and you are done.

Every thing is ok. not event single code to write and you are done with CRUD operation in Mvc with entityFramework.

Last Thing you Have to do is add connection string if you are not using express version with default instance name
if you following along me article, then first you get this page with big server error ,  


 But this is not the bug in the code.

just add /Users to existing Url and hit error.


 For any error come to feel free to drop message at @RakeshYadvanshi
  
Download Code here

Code First Approcach startUp with MVC

Prerequisite:
you should be aware of basic working experience with visual studio

Souce: CodeProject

In this Article I am going to set up environment MVC project with EF

Entity Framework introduced Code-First approach from Entity Framework 4.1. Code-First is mainly useful in Domain Driven Design. With the Code-First approach, you can focus on the domain design and start creating classes as per your domain requirement rather than design your database first and then create the classes which match your database design. Code-First APIs will create the database on the fly based on your entity classes and configuration.


As a developer, you first start by writing C# or VB.net classes and context class. but I will start with c# When you run the application, Code First APIs will create the new database (if it does not exist yet) and map your classes with the database using default code-first conventions. You can also configure your domain classes to override default conventions to map with database tables using DataAnnotation attributes or fluent API.
The basic workflow would be:
Write application domain classes and context class→ configure domain classes for additional mapping requirements → Hit F5 to run the application → Code First API creates new database or map existing database with domain classes → Seed default/test data into the database → Finally launches the application

What is Application Domain class or context classes or seed , For now just keep them in your mind as Class with some properties and methods. I will explore these word in deep in upcomming articles

I have installed following. but you following along me with any of the version of visual studio 2010+ any sql server
  • .NET Framework 4.5.2
  • Visual Studio 2015
  • MS SQL Server 2012 Express
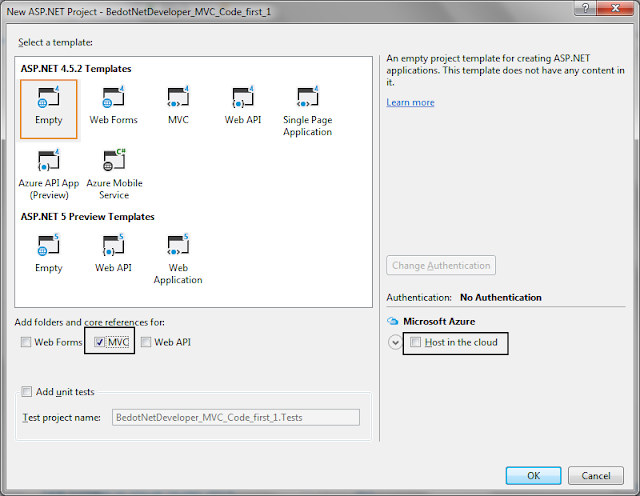
1. Create Empty MVC project.
2. Select Empty Mvc Project.


3. Right click on your project in the solution explorer and select Manage NuGet Packages.


4. This will open Manage NuGet Packages dialogue box.


5.  This will search for all the packages related to Entity Framework. Select EntityFramework and click on Install.
6. press ok for first pop up if come.

7. Click on the I Accept button in the License Acceptance dialogue box to start the installation.
8. After installation, make sure that the appropriate version of EntityFramework.dll is included in the project.

 Finally your project is setup for your mvc project with EntityFramework.
download this project at Link 

Send Email using c# with proccessing bar

In this,post i will explain how to send email using c# with proccessing bar.
To do this,you have to follow few below given step.
step 1. first of all create a form as shown below:-


step 2. After making a form,drag a openfiledailog tool so that you can give path to file that you want to send              to the email.

step 3. Double click the select button shown in image above and paste below given code.

  if (openFileDialog1.ShowDialog() == DialogResult.OK)
            {
                textBox6.Text = openFileDialog1.FileName;
            }

step 4. Now Double click the send email button and paste below given code.

 progressBar1.Visible = true;
            MailMessage Mail = new MailMessage();
            progressBar1.Value = 10;

            SmtpClient smtp = new SmtpClient("smtp.gmail.com");
            progressBar1.Value = 20;
            Mail.From = new MailAddress(textBox1.Text);
            progressBar1.Value = 25;
            Mail.To.Add(textBox3.Text);
            progressBar1.Value = 30;
            Mail.Subject = textBox4.Text;
            progressBar1.Value = 35;
            Mail.Body = textBox5.Text;
            progressBar1.Value = 40;
            System.Net.Mail.Attachment attachment = new System.Net.Mail.Attachment(textBox6.Text);
            progressBar1.Value = 50;
            Mail.Attachments.Add(attachment);
            progressBar1.Value = 55;
          
       
            smtp.Port = 587;
            smtp.Credentials = new System.Net.NetworkCredential(textBox1.Text, textBox2.Text);
            smtp.EnableSsl = true;
            smtp.Send(Mail);
            progressBar1.Value = 100;
            MessageBox.Show("mail send");
            progressBar1.Visible = false;

step 5. Now Run the program by ctrl+F5 or using menu bar(go to Debug<<start without debugging).
            and fill the given fields and click send email button.
Thank for reading this..
Enjoy code


How to send email using c# with attachment

In this post, I will tell how to send email using c#.

There are few steps that must be followed to make email client that can send email from gmail account to any of other email address. For this we will use a new class System.Net.Mail and use some of there method like MailMessage and SmtpClient.

Step 1. Make a form shown below:-


Step 2. In this. we will use a tool  Openfiledialog which will be used for selecting the file, so select openfile dialog  and drag it on the window form
Step 3. Now double click on select file button and paste the coding:-
 (Note:- before pasting this code add a referance to the class using System.Net.Mail;)

if (openFileDialog1.ShowDialog() == DialogResult.OK)
            {
                textBox6.Text = openFileDialog1.FileName;
            }
Step 4. Again come to design view and double click on the send email and paste the coding:-
  MailMessage Mail = new MailMessage();
            SmtpClient smtp = new SmtpClient("smtp.gmail.com");
            Mail.From = new MailAddress(textBox1.Text);
            Mail.To.Add(textBox3.Text);
            Mail.Subject = textBox4.Text;
            Mail.Body = textBox5.Text;
            System.Net.Mail.Attachment attachment = new System.Net.Mail.Attachment(textBox6.Text);
            Mail.Attachments.Add(attachment);
            System.Net.Mail.Attachment attachment1 = new System.Net.Mail.Attachment(textBox7.Text);
            Mail.Attachments.Add(attachment1);
      
            smtp.Port = 587;
            smtp.Credentials = new System.Net.NetworkCredential(textBox1.Text, textBox2.Text);
            smtp.EnableSsl = true;
            smtp.Send(Mail);
            MessageBox.Show("mail send");

Now save your project and run it and fill detail to send email.
Download source code(click to download)


Thank for reading this..
Enjoy code.

How to transfer data from one form to another form by passing values to form object ?

There are basically three steps to send the data to transfer data from one form to another:-

Step 1 )

a ).   Firstly open the visual studio.
b). Now select file and open project


How to add captcha to web form in asp.net .

The Capcha is stand for "Completely Automated Public Turing test to tell Computers and Humans Apart". The basic use of Capcha is to safe his/her site from automated programs that are made for different wrong purposes like entering unuseful data to any site so that his site goes down.

But solution to above problem is Capcha that provide scurity to us from these type of programs. 


In this Post , You will learn..

    1)  How To add Capcha  Control to Toolbox.
    2)  How to add Capcha Control to Web Form.


Learn  How To add Capcha  Control to Toolbox.

1)  First step of making site secure form programs is: Download the capcha from the below link.

How to add splash (startup) screen using c#

Hello Friends, We all have seen the Splash Screens of MS visual Studio , Phtoshop etc. it makes our Applications Look Great. So in this Tutorial we are going to tell u that how to add the splash screen to the Window Based Applications.


  Examples of Splash...

1. Start visual studio and create a new project (ctrl+shft+N).

How to add Nivo slider to website

Hello Friends , this time we have brought something new  4 you. we all know that it is little bit difficult 2 use Latest  Nivo- Slider.
                         So We have Made it simple 4 you 2 Use the Nivo- Slider With Our Updated Nivo- Slider.

How To Use:
 1. First of all,  download the Nivo slider.zip file from the below link. and extract it to a new folder.
Note . This File Has Been re-formated by me(Rakesh Kumar yadvansi) For Easy use (not developed from scretch).


2.  Now Start visual stdio and open website in which you want to merge nivo Slider.
3.  Open the web-page where you want to add Nivo-slider.
4.   open the folder in which nivo slider were extracted.
5. Copy all the Nivo Slider's Files except" help.txt" file.


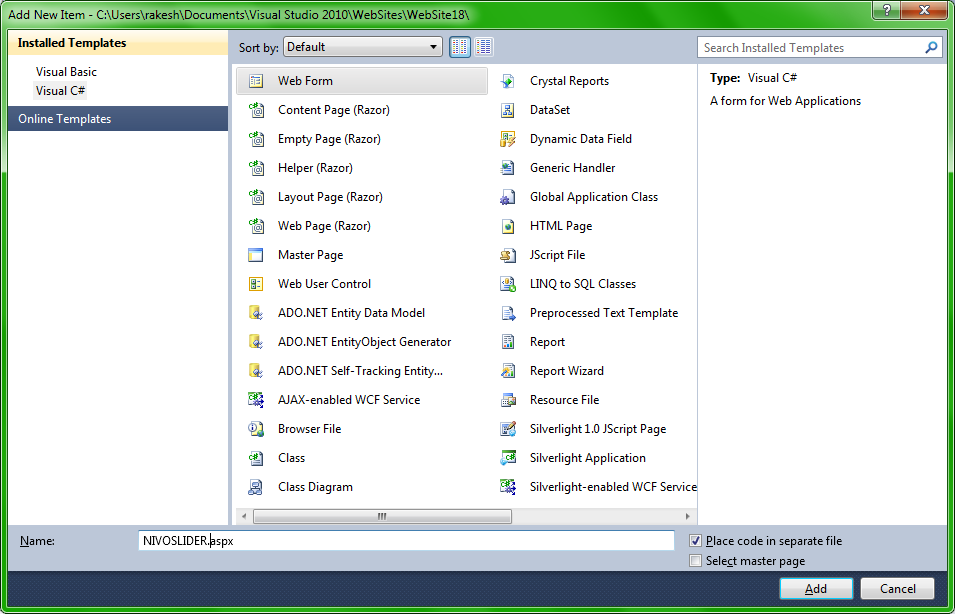
6.   Now paste all The Copied (Nive-slider ) Files  in the sloution explorer  as given below.


7.  Now again  open the Downloaded nivo slider folder and open help.txt file with notepad , copy the first  part code and paste it below the closing title tag of the webpage as given below.


8.  Now copy the second part and paste it in the body part(portion in which you want to insert the nivo slider.

9.     Run the page with shortcut (ctrl+F5).


Notice : Now Please click on the below or right hand side Adds (image or text).
This was the last step.
                                                              Follow Us,Join on Facebook and Enjoy

Learn How to call another .exe file in Window Based Applications using C# .

There are only two steps to call another .exe file from your window form.
Step 1.
Designing phase

    1.    Start visual stdio.
    2.    Create new project by File--New--Projects. It will look like….


   3.    Insert a Radio Button (if button is click then opera browser will be install and set  checked propert to false).
   4.    Insert a button (through which software will be install and set text propery to next)
   5.    Insert a Rich text box (in this terms and condition are shown.it will look like…..


  Step 2.
  Coding.
   1.    Firstly add the name space of “System.diagnostics”
   2.    Double click on button “Next” and paste the coding given below.
try
{
if (radioButton1.Checked == true)  // check if button is clicked or not
{
string str = @"E:\internet\INTERNET\setupopera.exe";   // this stiring store the address of the exe file and can be change according the location
Process process = new Process();    // this will create the object of the process class.
process.StartInfo.FileName = str; // this will store the information of location
process.Start(); // this will start the exeecution
}
else
{
MessageBox.Show("radio button not selected");
}
}
catch
{
MessageBox.Show(e.ToString());
}

 Note: Before running it just change your path of file otherwise it will give error.


  Notice : Now Please click on the below or right hand side Adds (image or text).
This was the last step.


                                                          Run and enjoy.


How to make .exe or setup file of window based application in .Net ?

 
 1)      Start the visual studio.
 2)      Open a project of which  you want to make an .exe  or setup file (Ctrl+shift+O) .
 
3)      After opening your project.
4)      Right click on solution in  “Solution Explorer Tab”.
   
5)      After right click, Select  Add>> then “New project”.
 
 6)      A new window will open as shown below.

 
7)      Now select “Other Project types “and expand it in above image.        (look at Left hand side).
8)      Now select “setup and Deployment” and expand it.
9)       Select “visual studio installer”.
10)      Select “setup project”.
   
11)      You can change the Name of setup and browse the folder  where you want to save the setup.
12)      After selecting desire folder, click ok. And a new window will open.
13)      Now select Application folder. 


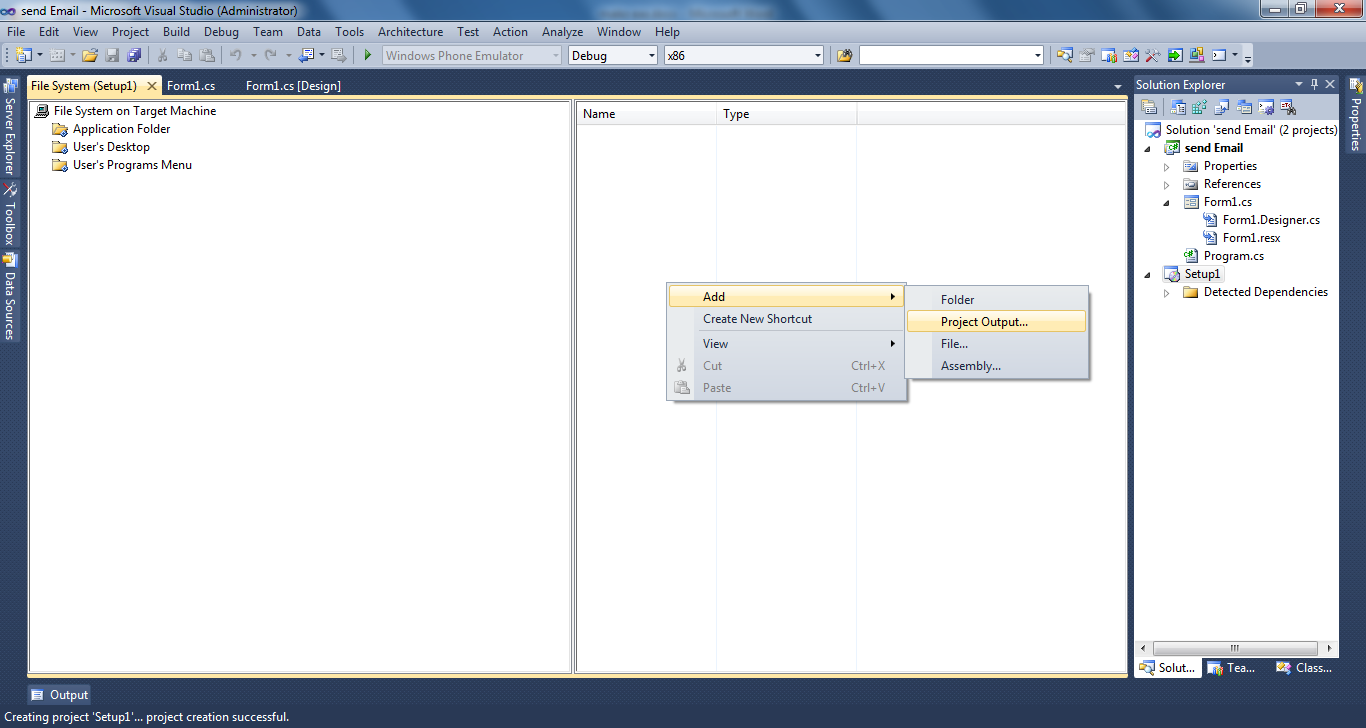
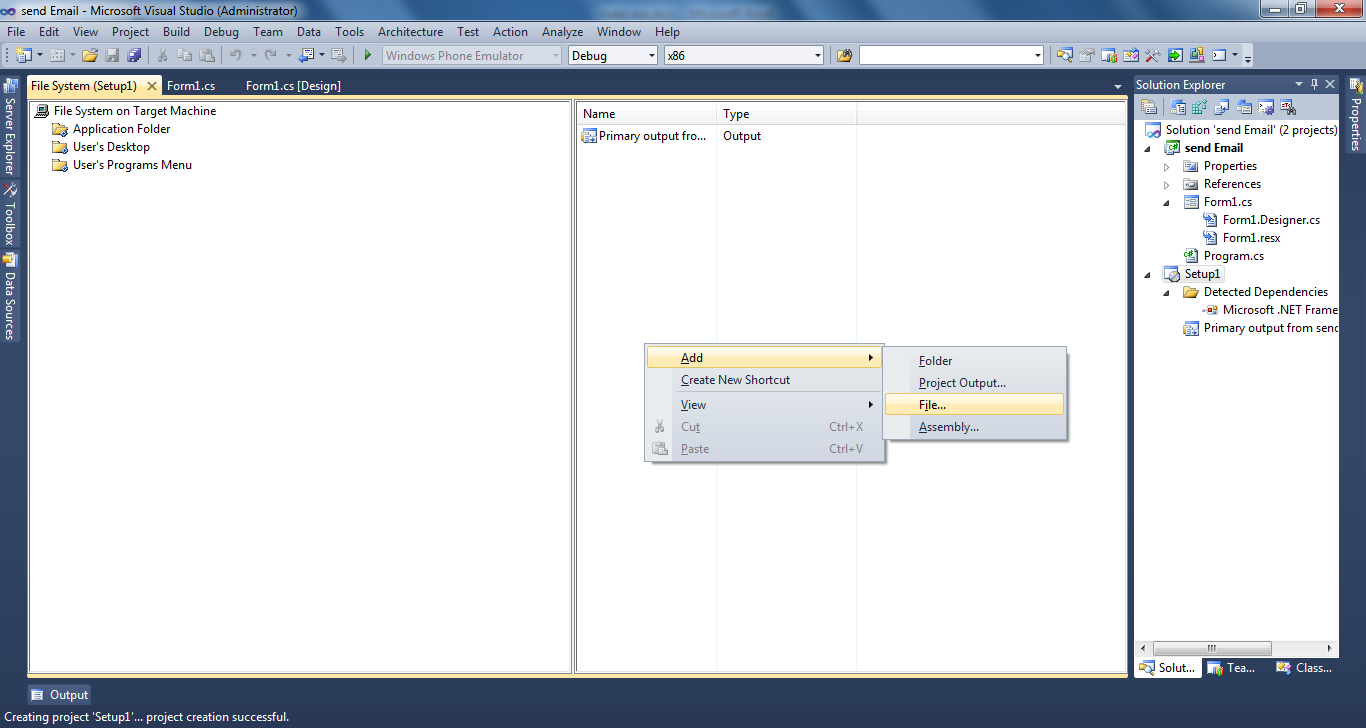
14)   Right click on blank area.
15)  select add>>project  output.
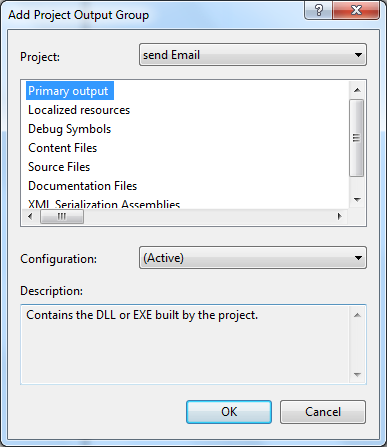
  16)  New dialog box will open as show below. Now select “ primary output”  and click ok.
    * Now we have to add an icon to the setup file.

17) Again click on empty area.
18) Add>> file
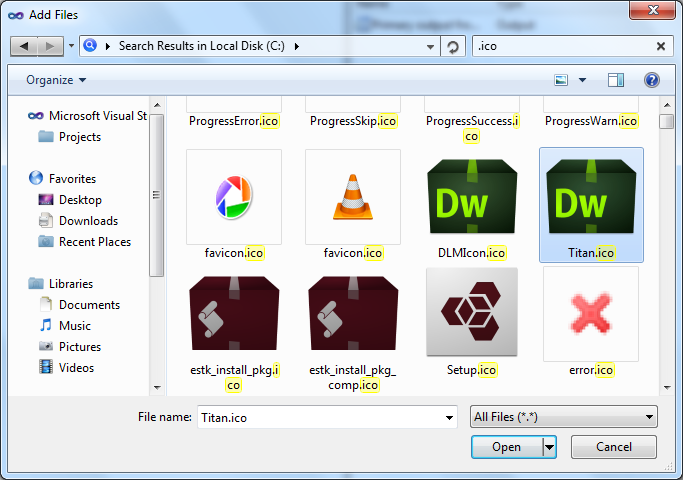
  19) A new window will  open as  shown below.
   20) select the icon(extension “.ico”).  21) click open . *Now we have to create shortcuts of the software to Desktop.

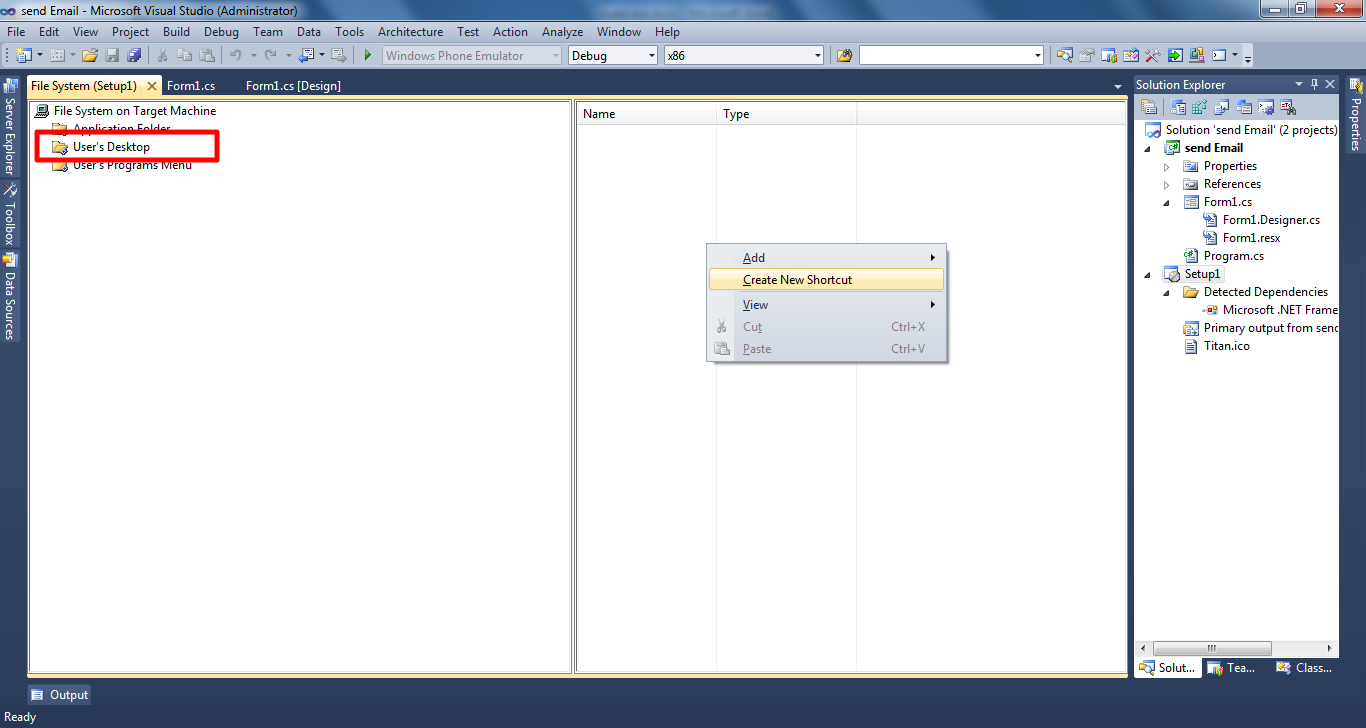
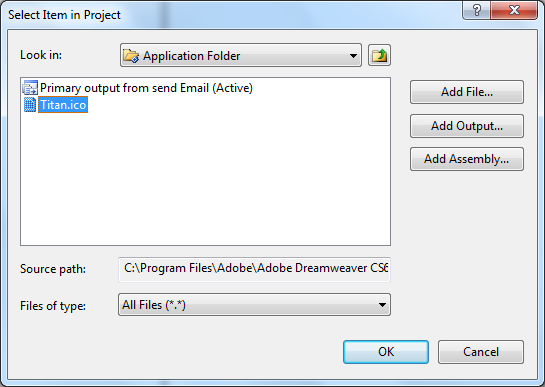
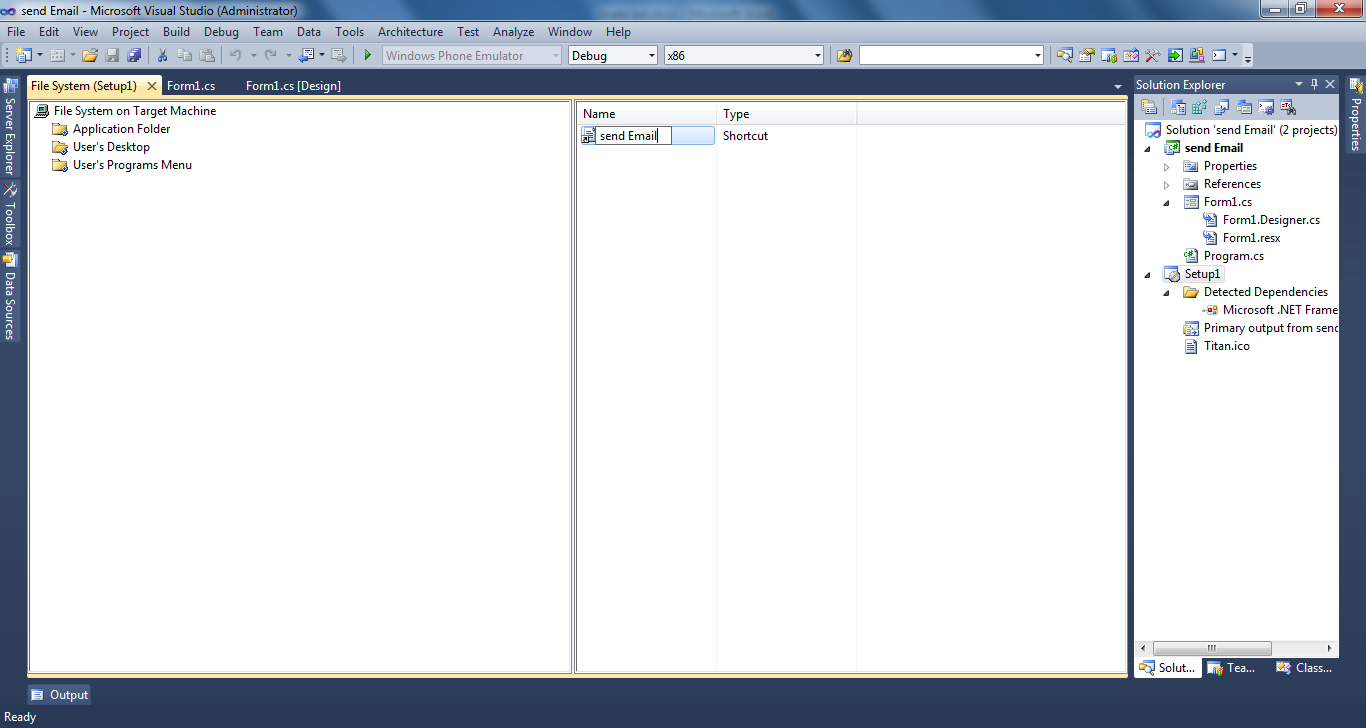
22)  select user Desktop.23) Right click on blank area in R.H.S.24) select  “ create new shortcut” .   25) Select “Application folder” and click ok.26) Then select .ico file as below . Then ok. 

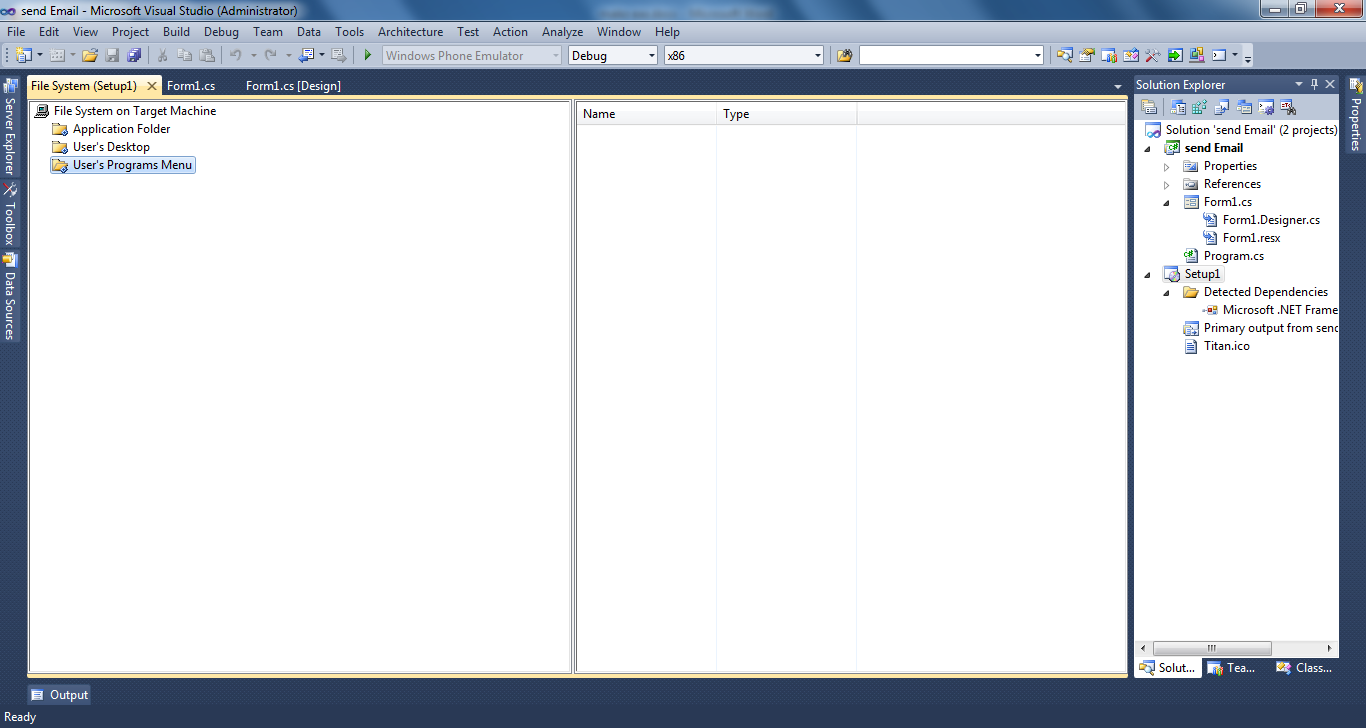
 27)Now you can change the name of set file .28) Right click on “Send Email”and .select “properties window”  
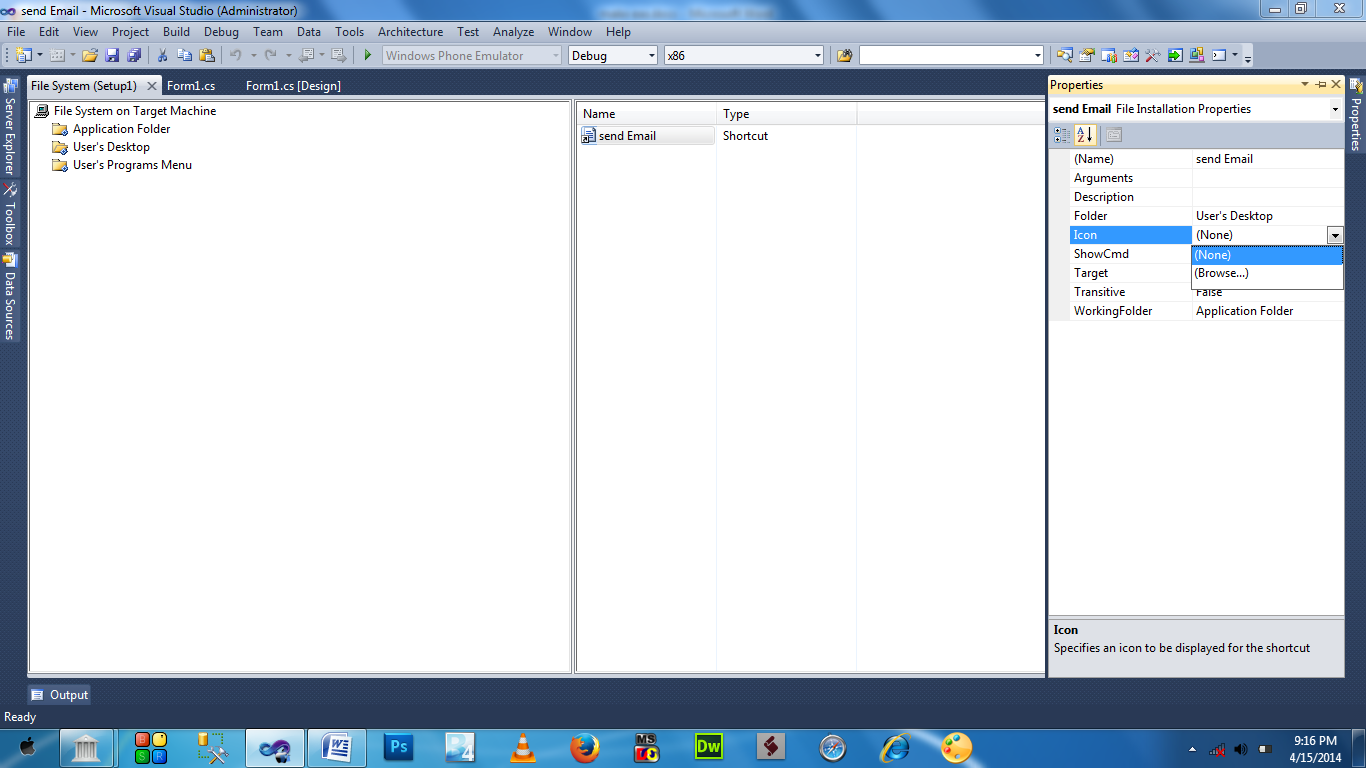
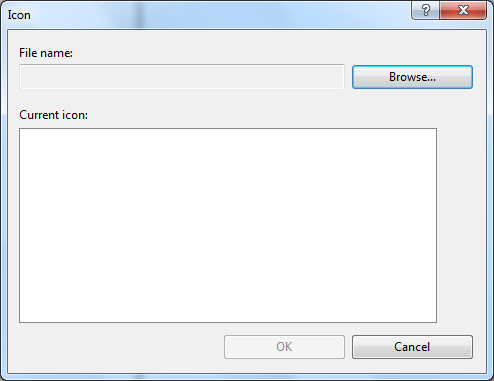
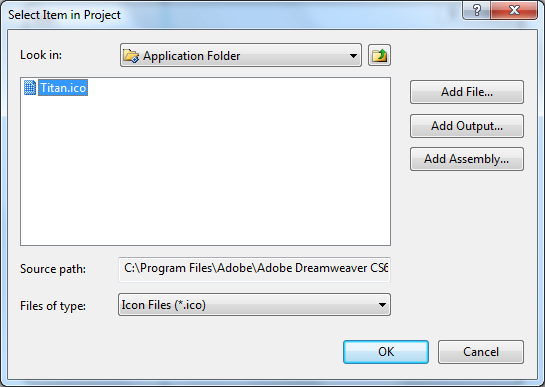
  29) select the icon and click on arrow button and select  browse.   30) select the icon(extension .ico) by clicking on browse button. 31)A new window will open . Double click on Application Folder and double click the file and select  the icon.    *Now we have to create shortcuts of the software to start menu.a) In this there are same step as performed in above step 1 to step 31.Only difference is now we select “User’s Program Menu” as shown below.   Last step for the completion

a)  Open solution explorer and click on build and you are done.  b)  This will be your setup location This was last step. Now you can install this software in any computer.
Thanks for reading it.
Enjoy.

Notice : Now Please click on the below or right hand side Adds (image or text).